Thursday, October 25, 2012

Scrumptious Veggie Wraps

Scrumptious Veggie Wrap!


I like Mexican food because I think that some of the flavors match with Indian style of cooking. Mexican food is spicy and they too use beans, rice and veggies in their food. Even the tortillas are somewhat similar to chapati. So i thought why not use all these ingredients and turn it into a full meal wrap. I have used spinach and herb tortillas for the wrap as it adds nice color and flavor to it. You can use any kind of tortilla you like. Also for mexican rice i have used brown rice, you can very well go with white rice. The reason I used brown rice is that it's more healthy and i love it's flavor - it is kind of rustic. This dish needs some preparations in advance, rest is just assembling and you are ready to go! Here's what you will need.


INGREDIENTS :-
~~~~~~~~~~~


1 packet Garden Spinach Herb wraps


1 zucchini, quartered lengthwise and cut into 1 inch strips
1 summer squash, quartered lengthwise and cut into 1 inch strips
1 onion, peeled and cut into thin strips
1 red bell pepper, cored and cut into 1 inch wide strips
2 Jalapenos, cored and cut into strips (optional)
1 can black beans, drained and rinsed
1 tbsp olive oil
salt to taste
1-2 tsp freshly ground black pepper
juice of half a lemon
Sour cream for topping
Hot pepper mexican blend cheese for topping


Guacamole - recipe follows
Mexican rice - recipe follows


DIRECTIONS :-
~~~~~~~~~~


1.  Pre-heat oven to 450 F

2.  On a baking sheet, toss each vegetable with salt, black pepper pwd. and olive oil. Roast  them in separate bunches for about 15 mins. stirring once till veggies turn soft and golden.


Roasted zucchini and summer squash


Roasted onions and Jalapenos


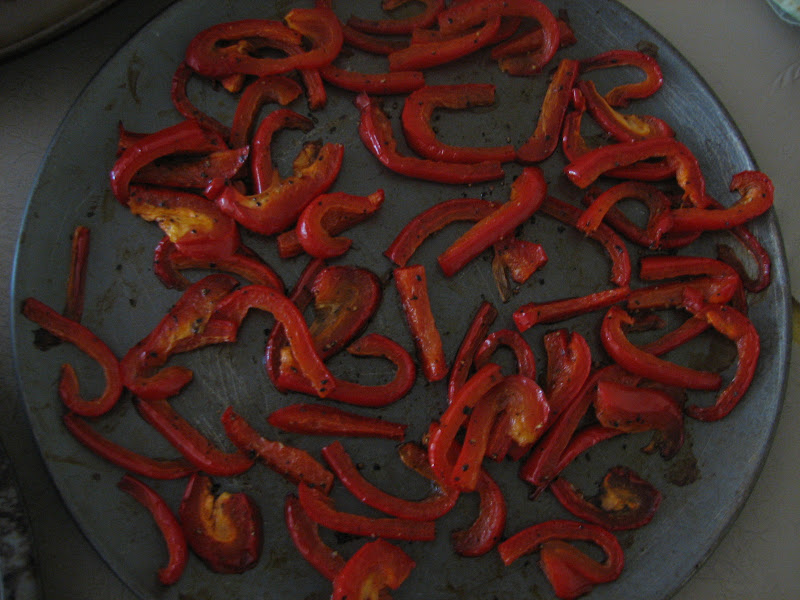
Roasted red bell peppers


3.  Prepare the gaucamole and rice. Let the rice cool before filling.

4.  Toss the black beans with salt, lemon juice and black pepper pwd.

5.  Warm the wrap on a skillet for a couple of seconds turning on both sides or in microwave for 8-10 sec. Place it on the plate for assembling.

6.  Spread a spoonful of guacamole on the wrap. Next, spread 3-4 strips of each vegetable on the wrap, do not overstuff the wrap.


 7.  Spread a spoonful of rice and beans.


8.  Top it with a dollop of sour cream and cheese.


9.  Fold it from two sides then roll it up from the bottom into a perfect roll.


10. Cut diagonally and enjoy the juicy, mouth-watering veggie wraps!!!


Beautiful layers of veggies, black beans and rice in a juicy wrap!


GUACAMOLE :-
~~~~~~~~~~


Guacamole
 

2 avocados, peeled, chopped & mashed with fork
1 small tomato, chopped
1 small onion, chopped
1 jalapeno, chopped
salt to taste
1/2 tsp black pepper
1/2 tsp lemon juice
Handful of cilantro chopped


Mix the above ingredients properly and set aside.


MEXICAN RICE :-
~~~~~~~~~~~


Mexican rice


1 cup brown rice, washed and soaked for 30 mins, then drained
2 cups water
1 garlic clove
1 small tomato
1 small onion
2 jalapenos
1 1/2 tbsp oil
2-3 squirts of lemon juice
salt
handful of cilantro, chopped


1.  Grind garlic, tomato, onion and jalapenos into a fine paste.

2.  Note that brown rice takes more time to cook than white rice.

3.  Heat oil in a pressure cooker on medium heat, add rice and fry it for 3-4 mins stirring continuously.

4.  Add the blended paste, stir for a minute then add salt and water. Stir it for one more  time, close the lid and pressure cook with 4-5 whistles till the rice is soft and fluffy.

If using a pan instead of a cooker, cook for 20-25 mins. till rice is soft and tender.

 
5.  Add lemon juice and garnish with coriander.


Specks of black beans and veggies can be seen


Thursday, July 26, 2012

Cabbage and Carrot paratha

Cabbage-carrot paratha, this will surely put a smile on your face


A paratha/parantha/parauntha is an Indian flat-bread that originated in the Indian subcontinent. Paratha is an amalgamation of the words parat and atta which literally means layers of cooked dough.  I also came to know that in Burma, it is known as palata while it is known as farata in the Maldives.


It is one of the most popular unleavened flat-breads in Indian cuisine. It is made by pan frying rolled whole wheat dough on a tava or flat surface griddle. Parathas are usually stuffed with vegetables and/or Paneer (Indian cheese). You need to be very careful while rolling these parathas as you do not want the stuffing to come out. There is one more style of parathas popular in western part of India in which vegetables are finely grated or chopped and are mixed with dough and spices. This way the rolling becomes little easier. But again, this works with specific kind of vegetables like carrots, cabbage, spinach, methi leaves, coriander, dudhi (bottle gourd) or muli (white radish) etc.


Sizzling hot paratha with a chunk of butter on top

Whichever way you make, parathas are all time favorites. They are good as snack or light lunch. You can serve it with ketchup, chutney, Indian style pickles or roll it and eat it along with tea or coffee. I think this is the best way to feed different veggies to kids.  Kids love it with a dollop of butter or with generous amount of ghee on top. (Ghee is widely used in Indian cooking, it is also called clarified butter) This is a healthy dish for breakfast and a lot filling too. Vegetable parathas can be made in advance and stay fresh for 2-3 days at room temp. Paneer parathas maybe will stay for a day outside then need to be refrigerated.


Specks of green and white can be seen on the golden-brown parathas

Today we are making cabbage and carrot parathas. This recipe will make around 12-13 parathas.


Ingredients :-

1/2 cup cabbage, grated fine
1    carrot, grated fine
4-5 cloves garlic
3-4 green chillies (or acc. to taste)
1 inch piece of ginger
Handful of coriander leaves, chopped fine (optional)
Salt (acc. to taste)
1 - 1 1/4 cup whole wheat flour
2 tbsp gram flour or besan
2 tbsp rice flour
3 tbsp plain yogurt or dahi
Oil/butter/ghee for shallow frying

Process :-

1.  Make a fine paste using green chillies, garlic and ginger. You can also use store bought paste but i encourage on using fresh ingredients and believe me it takes just a couple of mins. of your time and the food tastes excellent.

Cabbage, carrots and green-chillies, ginger and garlic paste


2.  Mix the rest of the ingredients except oil to make a soft pliable dough. You must have noticed that we substituted yogurt instead of oil while making the dough. The reason is yogurt is a healthy ingredient and it does the same task as oil - keeping the parathas soft. The dough has specks of orange, green and white due to the veggies.


Dough ready to get rolled


3.  Heat the tava or flat surface griddle on medium high heat.

4.  As this dough is soft, you need to be careful while rolling it. Use a lot of flour on the rolling pin as well as on the surface. Divide the dough into 12 or 13 equal parts and shape them into balls. Take one ball and roll it gently into a 6-7 inch diameter.


Paratha ready to hit the hot griddle


5.  Place the paratha on the tava. After 15-20 secs. u will see bubbles forming on it, turn the paratha using a spatula and smear it with a tsp of oil/butter/ghee. Turn the paratha again and let the buttered side cook for 1-2 mins. till golden brown spots start appearing. Meanwhile smear a tsp of oil/butter/ghee on the other side and repeat the process. Serve them sizzling hot with a dollop of butter/ghee on top.


Golden brown spots appear on the paratha, get ready to plate it

Isn't this a fabulous way to start your day :)


Wednesday, July 18, 2012

Chhunda (Sweet, tangy and slightly spicy Mango pickle)


Chhunda


It's summer again!!! And it's time for MANGOES! Chhunda is a pickle made from raw mangoes and it has mixed flavors like sweet, tangy and little bit spicy. This pickle comes from western part of India, from a state called "Gujarat". 

Growing up, i remember the kitchen shelf filled with 10-15 different varieties of mango pickles - sweet memories :) Thanks Aai!

Traditionally, this pickle is prepared using heat of the sun. It may sound weird but it is really very flavorful this way. Here's how it is done,  first of all the ingredients are properly mixed in a big stainless steel bowl. Then it is covered with a muslin cloth (cheese cloth) and left in the sun for a couple of days, typically 10-15 days. Every night it is brought in the house and next morning the cloth is removed and mixed thoroughly with a big spoon and again covered and left in the sun. What happens here is, slowly all the ingredients mingle properly and the raw mango starts cooking with the sun's heat and after a couple of days you can see that the pickle is ready. It is stored in an air-tight jar for the whole year. And believe me it tastes yummy and needs no artificial preservatives at all. Isn't this something great - the preparation and preservation of pickles. 


Chhunda


I made this pickle using a stove top, no doubt there is slight  taste change - the one with the above recipe is a lot tastier but trust me this too is worth making.  For this you will need raw green mangoes, press and make sure the mango is firm. The most important thing for this pickle is the mango should be tangy, it shouldn't have a bland taste, else it is not at all right for the pickle. You will need a couple more spices, i have listed them below. I have used 1 medium sized mango and it makes a small bottle of pickle (around 13 oz)

Ingredients :-

1 medium sized raw green mango
1/4 tsp methi (dried fenugreek) seeds
2 1/2 tbsp oil
5-6 cloves whole
7-8 black pepper whole
4-5 dried red chillies, broken into half
1 inch cinnamon stick, broken into half
1 tsp red chilli pwd
Salt (acc. to taste)
3/4 cup - 1 cup sugar
1/4 tsp cinnamon powder


Process :-

Raw mango


1.  Peel the mango and grate using a thick grater. This way when we cook it, the pickle won't turn mushy and we will be able to see the mango shreds.


Grated mango


2.  Measure the grated mango using a measuring cup. Taste the mango, the quantity of sugar depends on how tangy it is. If the mango is extremely tangy then you will needed equal quantity of sugar else reduce the amount of sugar. See if the following helps,

If mango extreme tangy :
            1 cup shredded mango = 1 cup sugar
If mango less tangy        :
           1 cup shredded mango = 3/4 cup sugar

3.  In a saucepan, heat the oil to medium heat, add the spices (cloves, black pepper, red chillies, cinnamon stick and fenugreek seeds).


Mango and spices getting cooked


4.  Now add the grated mango, salt and mix everything with a spatula and let it cook covered for 5-10 mins, it should not turn to a mush.

This tip is for beginners, just take a piece between your thumb and fore finger and press it, if it gets pressed without effort it means it is cooked.

5.  Add sugar, mix properly  and let it cook uncovered for 10-15 mins on medium heat. Now the sugar will melt and start to thicken, keep an eye on it. When the syrup becomes the consistency as that of  "honey", add cinnamon powder and turn off the heat.

The final result should be thick like a jam, it should have syrup. Keep this in mind, once the chhunda starts cooling, it is going to thicken. So keep a close watch during this process.


Sugar getting melted


6.  After 2-3 mins, add red chilli powder and mix. If we add it during the above process, red chilli pwd. can burn or change color. We want our pickle to be red, the color of chilli pwd and so we add it once the heat is turned off.


Red chilli pwd. added to chhunda


7.  Once chhunda is cooled, store it in an airtight container. Stays good on shelf for months. It can be used as a spread for chappatis or tortillas, also eaten along with chappati and sabji. As this pickle also has a sweet taste, it is a favourite with kids, this is a good way to add mango to their diet.


Chhunda - ready to enjoy!

Wednesday, July 11, 2012

Lasuni Gobi (feeds 2-3)

Delicious Lasuni Gobi

This is a yummy and filling appetizer from India with a Chinese twist on it. And this makes it different from the traditional Indian taste. It comprises of fried cauliflower florets coated with tangy and spicy sauce concoction. This recipe can be made well in advance and can be heated up when needed. It goes well with Punjabi food. Also it tastes great all by itself.

As its name suggests, it uses 2 main ingredients - Gobi i.e. cauliflower  and Lasun i.e. garlic. It also uses chinese sauces - soy (which gives a salty tangy taste)  and chili (to spice it up). Other ingredients are easily available in your day-to-day pantry.

Let's have a look at the ingredients and then its process.

Ingredients :-

For the batter :

1 cup all-purpose flour
1/2 tsp salt
3 cloves garlic (grated fine)
3/4 - 1 cup water (for thick batter)

20-25 bite sized cauliflower florets, washed and rinsed
Oil for frying

For the gravy/sauce :

2 tbsp oil
1 onion chopped
4 cloves garlic chopped fine
2 green chillies chopped fine
Salt (as required)
1 tsp dark soy sauce
1 tsp red chilli sauce
3 tsp tomato ketchup
coriander, chopped for garnish
scallions (green part), chopped  for garnish

Process :-


1. Mix flour, salt and garlic. Add water to form a thick paste. Thick enough to coat the cauliflower florets. Keep aside.


Bite sized cauliflower florets -washed and rinsed

Florets dipped in thick batter - ready to get fried


2. Pour oil in a large frying pan. Heat the oil over medium heat. Start dipping 4-5 florets in the thick batter (make sure they are coated evenly) and fry till they are golden brown and cooked through.

Do not over crowd the pan with more florets else the temperature of oil will be reduced and florets will turn soggy instead of crispy.


Deep fried golden florets


3.  Once all the florets are fried, mix soy sauce, chili sauce and ketchup in a bowl properly. Keep this mixture aside. Heat 2 tbsp oil in a wok or a skillet.


Soy sauce, Chili sauce and tomato ketchup

Soy, chili and ketchup mixture


4.  Add onions and saute it they turn slightly golden and translucent. Now add garlic, saute for a minute - don't let it burn. Add green chillies, saute and then add all the fried yummy florets. Also add the sauce mixture and mix gently - don't let the florets fall apart. Taste and add salt if necessary as soy sauce already contains salt.


Sauteed onions - slightly golden and translucent

Chatpati Lasuni Gobi - garnished and ready to eat


5.  Garnish with finely chopped coriander and scallions. Serve hot.  

Eat, live and enjoy!!!


Saturday, June 9, 2012

Strawberry Jam

Strawberry Jam


Welcome Spring! Cool, pleasant breeze, sunny and clear skies, flowers blooming, kids playing and varied array of berries back in season. So, i thought of making use of one of my favorite berries - Strawberries!! Did you know that jam, jellies, preserves and marmalades are all different forms of preserving the best fruits of season? Here's what i found, might help

  • Jam is made with whole fruit that is cooked down to release the pectin.
  • Jelly is made with fruit juice.
  • Preserves use the whole fruit without breaking it up.
  • Marmalade uses the zest and pulp, and the juice, however not the whole fruit.

Today i am going to make strawberry jam and to make the process a little bit quicker i am slicing the strawberries into halves or quarters according to their sizes. Also I like the strawberry fruit pieces when the jam is cooked through, it tastes good and looks good too. The recipe i am writing will make a little less than 16 oz. bottle of jam. Here's what you will need :

Ingredients :-

16 oz. / 1 lb fresh strawberries, cut into halfs or fourths
1 cup sugar
1/2 lemon's juice
1 whole lemon's zest
2-3 tbsp water


Strawberries - washed, cored and halved/quartered


Procedure :-

1.  On a medium-high in a heavy bottom saucepan take sugar and add water to it - just to moisten the sugar. Keep stirring.


Strawberries starting to release juices


2.  Once the sugar starts to boil, add cut strawberries and let it simmer.


3.  This process takes some time, strawberries will start releasing the juice, the color in the saucepan will turn to red due to the strawberry juice. Let it simmer. Keep stirring from time to time.


4.  After around 20-25 mins. you will see that strawberries have softened and start falling apart. Also the liquid changes to deep red color and the jam starts to thicken and starts coating the sides of the saucepan.

Color changes from red to deep red


5.  Now there are a couple of signs that will help you to decide whether jam is done or not.


     a)  When you run your finger through the back of your stirring spoon and it forms a  line, it means  jam is done.
     b)  Jam should have a consistency as that of honey.
     c)  Jam starts sticking the sides of the saucepan. 


A line is formed when you run your finger through the spoon


Jam coats the sides of the saucepan


6.  Once the jam is done, let it cool completely. Fill the jam in an airtight container and refrigerate. Stays good for a couple of months.


7.  Spread it on fresh hot toast or spread on whole wheat chappatis (Indian bread) and roll it up. This is a healthy option for kids. Whichever way you eat, you will be proud of your own creation :)


Friday, January 6, 2012

BASUNDI (feeds 5-6 approx.)


Basundi
Today's recipe is a sweet dish made from whole milk. This dessert reminds me of my childhood days. We had basundi in our house for a lot of occasions, sometimes even without occassions :) I love sweets and so i believe there shouldn't be any occassion to prepare sweet dishes. Enough about myself, let's focus on our recipe. Basundi is  famous in many parts of India. This dish is time-consuming but needs very few ingredients. There is one more dish called "RABDI" which is richer than basundi (recipe follows).  If you start making  basundi and have more time, you can make rabdi too, this way you get to taste 2 sweet dishes, the more the merrier :)


Basundi


Ingredients :-

1 gallon whole milk
1 1/2 - 1 3/4 cup sugar
25-30 almonds
10-15 cardamom seeds freshly ground
1/4 tsp nutmeg pwd.


Directions :-

1.  First of all, soak almonds in warm water. The reason   
     behind this is till the basundi is done, they become soft
     and  this makes it easy to slice them.

2.  Making basundi is a very simple process, but you need to
     stir it constantly else milk will stick to the bottom and
     basundi will have a burnt smell which no one will like.

3.  Start boiling the milk in a heavy bottom deep vessel on
     medium heat. This is going to take a while, about 1 - 1 1/2
     hour. Yes, you read it right, it is a long process and you
     need to keep an eye on it every minute, stirring it
     constantly but trust me the outcome will be delicious!!!

4.  After more than an hour, you will see that the milk
     changes its color. When it turns pale white in color and
     milk thickens a bit, add sugar and cardamom-nutmeg
     powder to it. Stir till sugar melts, about 5-7 mins., turn off
     the heat.

5.  Peel the almonds or leave its skin on and slice them
     diagonally. Sprinkle them over the basundi. Chill and
     serve.


Tips :-

1.  Basundi is a long process to make so i suggest you to make
     it in advance. If you want it for lunch, make it the
     previous evening and let it sit through the night in the
     refrigerator.

2.  Basundi and puri is a very famous combination. Other
     things, which go along with it are aloo sukhi bhaji and
     vegetable pulav. Try this menu, it is short and sweet :)


Rabdi :-

If you want to make basundi and rabdi both, take some thickened milk in another pan (before adding sugar) and keep stirring and boiling for some more time. Finally, it will be in semi-solid state, now add sugar. Once sugar melts, add sliced almonds. Chill and serve. Both sweets stays fresh for about a week when refrigerated.

Rabdi can be either by served by itself or pour chilled rabdi over hot jalebis and serve..... Yummmm..... Basically if you like sweets made from milk then you are on the right page :) Enjoy!!!